


June 20, 2019
The first few times you try to place a slider on a zip can be tricky, but once you have tried (and maybe not succeeded!) a few times, it will eventually become second nature to you.
There is a certain knack to threading the zip onto the continuous zipping, which can be quite fiddly and annoying at times! However, by using a simple tool called a zip-jig, available on our online shop, the job can be made relatively effortless. Plus, it works for both number 3 and number 5 zips, so one size really does fit all!
The zip-jig can simply be attached to a solid surface, such as your work bench or a spare piece of flat wood you have lying around. There are two handy holes already made in the zip-jig, so it is just a case of finding some screws and fixing it down.
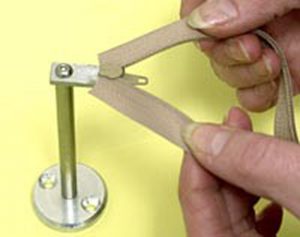
Step 1 – Once you have fixed down your zip-jig, the real work begins. You need to hold your zipper upside down with the large, rounded edge facing you, and the pull tab dangling down. The zipper then slides onto the zip-jig by the small section connecting the top of the zipper to the pull tab. Once your zipper is secure in the zip-jig, you can then move onto the zipping.
Step 2 – The zipping also needs to be held upside down (seems like a bit of an upside job by now!) with the smooth side facing upwards, not the teeth. The teeth then need to be separated at one end by approximately 7cm, with one side of the zipping in each hand. This then becomes the complicated step.
Step 3 – The movement of threading the zip onto the zipping is an inwards to outwards path. With the separated zipping, you need to approach the zip from the outside in, lining each side up either side of the partition in the zip. Ensure that the two sides are level, or else you will end up with a wonky zip that does not glide smoothly up and down your zipping!
Step 4 – Once you have managed to glide the zipping into the zip, the hand movements then needs to follow through with the zipping, causing the teeth on the zipping to meet again on the other side, hopefully level, with no gap underneath the zip. You can then move your zip freely to where by you would like it positioned on the zipping. If, however, it hasn’t quite gone to plan, you can always slide the zip off and try again until you are satisfied with the way the zip lies with the zipping.
We wish you luck and hope this blog post helps you out. From all of us at JA Milton Upholstery Supplies, happy upholstering!
Link to our handy zip-jig: